Mt Houou (鳳凰山, hou-ou-zan) is one of the peaks in the Southern Alps of Japan. Sitting at an elevation of 2841m, its summer climbing season starts a little earlier than some of its 3000m+ Southern Alps neighbours like Mt Senjo and Mt Kita, and so I was able to climb this one in June. Notably, there is no one peak that is called “Mt Houou” but instead the mountain is officially comprised of 3 separate peaks - Mt Jizo (地蔵岳), Mt Kannon (観音岳) and Mt Yakushi (薬師岳).
The word “houou” translates to phoenix in English. For the Pokemon fans, you might recognise this from the phoenix Pokemon Ho-oh. It seems like in the Japanese version of the game the Pokemon is also called Houou, which means they literally just named it “Phoenix” (very original).
Hiking Mt Houou: a quick summary
3 - 4 hours from Tokyo via Kofu or Nirasaki stations, then a local bus. All four trailheads have busses running in summer, but some require reservations in advance and only run on weekends.
- Dondoko-sawa loop (Aoki Kosen) hard Bus12.8 hrs · 15.2 km · ↑ 2045m
- Yashajin Pass out-and-back hard Bus12.8 hrs · 20.8 km · ↑ 1937m
Mt Houou can be done as a long, 12-hour day hike, and this is how most people hike the course. Instead, I chose to do it with an overnight tent stay at the Mt Houou hut campsite. This was my very first time doing a solo tent hike. I did a number of solo mountain hut stays last year, and decided I want to level up this year and try using my tent instead. To be honest with you, because of that, I did go into this hike with a fair bit of nerves!
The reason I chose Mt Houou specifically though is that their campsite is a little bit down from the peak and is well-sheltered (no worries about being blown off the mountain by winds in the night). Plus if you break up a long 12-hour hike into 2 days, each day becomes fairly manageable (even when lugging a tent on your back) and so I felt would be a good course for a first time solo tent-hiker like me.
Mt Houou has 4 trailheads and quite a number of course options. Today I chose to set off from the Aoki Kosen (青木鉱泉) trailhead, taking the Dondoko-sawa (ドンドコ沢) loop course. This is best-accessed by car, but there is also a bus available on weekends (requires prior reservation).


Aoki Kosen is an onsen/lodge that has been here since the Meiji era. Interestingly, it was my first time seeing an onsen referred to as a “Kosen”. The definition seems to be a bit nebulous - but I think onsen water contains gas, while kosens do not.
The onsen seemed almost deserted - and with the rough roads up to the trailhead here, I couldn’t imagine many people using it other than hikers. But it seems to have a long history, having first been built in the late 1800s. The current one standing is no longer the same building, but a replica of the original (which is pretty cool in and of itself).
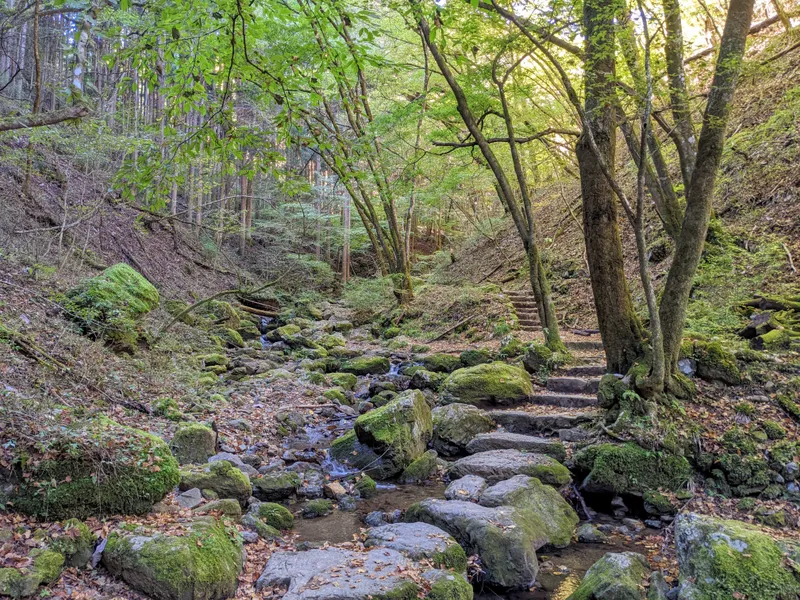
The course is named after the Dondoko-sawa or “Dondoko stream”, and you’ll climb a path that runs mostly parallel to this stream all the way until you reach the Mt Houou mountain hut.


Along the initial climb there are a couple of small stream crossings, some narrower paths to traverse, and the occasionally clamber up a rock with the aid of a rope.


In particular there was one stream crossing where it seems like it had overflowed onto the path, so I needed to keep my balance here!

When I was looking at the website for this mountain hut, it noted that the Dondoko-sawa course is considered to be of at least an intermediate difficulty. With these little stream crossings and rope-climbs along the way, I can see why. It’s not difficult by any means (and I felt comfortable enough to hike it alone) but especially with a heavy pack, I can definitely see why you wouldn’t want to recommend it to a beginner hiker.

Along the way you’ll pass the first waterfall on your route, Minami-shojiga-taki (南精進ヶ滝).

If you look closely there’s a rather rounded, comfortable looking basin partway down there. Of course there is absolutely no way of getting to it (and you would probably die if you did) but looks pretty comfy all the same.

The hiking app I use (YAMAP) has a feature where users can leave comments at parts of the route. There was one stream crossing marked on YAMAP that had a bunch of comments about how to cross it.

When I came to it, and crossed it, I didn’t really understand what all the fuss was about! (Just head in a straight line, really).
However what the actual problem was, was that after crossing it you might naturally want to continue heading up the forested path in front of you, but there’s actually a second stream crossing that you need to do in quick succession.

Confusingly, while Japanese trails use pink tape to mark the trail, someone had used a separate red tape - presumably hung up between two trees - to indicate you should not go in that direction. However the tape had ripped, and it kind of looks pink at first glance as well.

The mountain hut had noted that people also get lost on this trail sometimes, and I can see why. A GPS app for sure will come in handy on this course.

Interestingly I could see this shrub had some strikingly green tips.


I tried to figure out what it is, and it might be a Japanese Northern Hemlock (コメツガ) with some new leaves coming in.
In total there are four waterfalls you pass on the Dondoko-sawa course. One of them (Houou-taki) is skippable as it’s off the main course, and the third one, Shiraitono (白糸ノ滝) is a little obscured by the trees.


The fourth and final waterfall on the course, Goshikino (五色ノ滝) is a show-stopper though.

You can take a path right down to the foot of the waterfall, so you can basically get as close as you like.

The photo really doesn’t do it justice, but in person it really looked amazing. Probably the best waterfall that I’ve ever seen on a hike. And with how quiet the hiking trail up had been (I saw 2 people in 6 hours) I had the whole waterfall to myself. If you can make good time up the mountain I’d definitely recommend taking a lunch break here, but it was already after 1pm for me so I headed on shortly afterward.


As I kept gaining in elevation, I saw some more hemlock bushes. Maybe due to the additional elevation, this one wasn’t quite as far along in its sprouting process and you could just see the buds.

As you get closer to the mountain hut, you suddenly leave the forest and enter a rather sandy field (stream bed?). For any gamers out there, it felt like I had entered a new Minecraft biome.

Side note, my favourite thing to do when I played Minecraft was to travel across the map and find a new spot next to a stream with a wide open field so I could put down a fancy house and raise some sheep and chickens and it felt like I had found exactly that.

Actually, this part of the course is also a little confusing since the path isn’t so clear at times but with a GPS app you shouldn’t stray too far off course.
Climbing to the Mt Houou mountain hut
At 2:30pm, I reached the Mt Houou mountain hut (鳳凰小屋) where I was promptly checked in by one of the hut staff. All-in-all it took me a little over 5.5 hours to climb up here. With a 13kg pack I was quite worried how I was going to fare on this climb up, but I made it. (I was fairly exhausted, though).

One of the cool things about the Mt Houou hut is that they have unlimited fresh spring water that they get from the river outside (drinkable as-is). The hut also seems to recently rebuilt, having re-opened in 2024. The toilets were super clean as well.


The campsite is right out the back of the hut. On busy weekends you have to book, but on weekdays you can just rock up and grab a spot. When the campsite is full it’s supposed to fit up to 30 tents, which I think would be a super-duper tight squeeze when you see this is the size of the campsite.

Three solo hikers on the right had already set up when I arrived, and then a group of three on the left arrived a little later as well, for a total of 7 tents.
For dinner, I had my favourite flavour of cup noodles - curry flavour.

I didn’t think a pack of cup noodles would fill me up so I brought some more dinner. I clearly didn’t think it through and also brought along some instant rice and curry from Muji for dinner.

In between my first and second dinner (well, I suppose a late lunch and early dinner) I fell asleep once or twice. And I think this then made it really hard to fall asleep once nightfall came. The group of 3 also didn’t get the concept of tents having paper-thin walls so were just carrying on with their conversation right outside their tents while the rest of us were trying to sleep. But when one of them kept on saying “wow, look at the stars!” I figured I may as well take a peek as well.

It had been quite cloudy all afternoon, and it seems it had cleared up as the sun set - hard to get a photo but it really was beautiful. So I suppose a thanks is in order to the guys that were being slightly-too-loud.
So one of my anxieties with solo tenting is whether I would be able to set it it up, or if somehow I would be left without a home on the side of the mountain for the night. Of course, this is a pretty unfounded anxiety (I have set up this tent multiple times before) but all the same I made sure to set up the tent myself on our recent Izu roadtrip just to double-check I remembered how to do it.
What I didn’t account for, though, was that it was a bit cold! Not super-freezing, but with my thin summer hiking pants (plus a thin down jacket and regular jacket on top of that) it was kind of like an uncomfortable type of cold, which also made it harder to fall asleep. It’s been a bit cool lately in Japan (around 20℃ down in the town below on this day). I assume up on the mountain to got to somewhere under 10℃.

One life hack which came in handy is to heat up some water on the burner and then put it in a hard plastic water bottle like a Nalgene. It makes for a great hot water bottle.
Reaching Mt Houou’s Obelisk
The next morning, after some tossing-and-turning, I ended up packing away my tent earlier than I had planned and set out at 5am. I figured if I was going to be awake anyway, I may as well get on with the hiking.

The trail starts out to the left of the hut building, where you’ll make a direct climb up to the three peaks of Mt Houou.

As a side note, the course is set up such that if you had a lot of spare time on day 1, you could leave your tent at the campsite and do this hike up to the first peak and then back down to your tent again, which would save on having to lug up your tent for the entire distance.


After a steady climb through the forest, I reached yet another new biome.


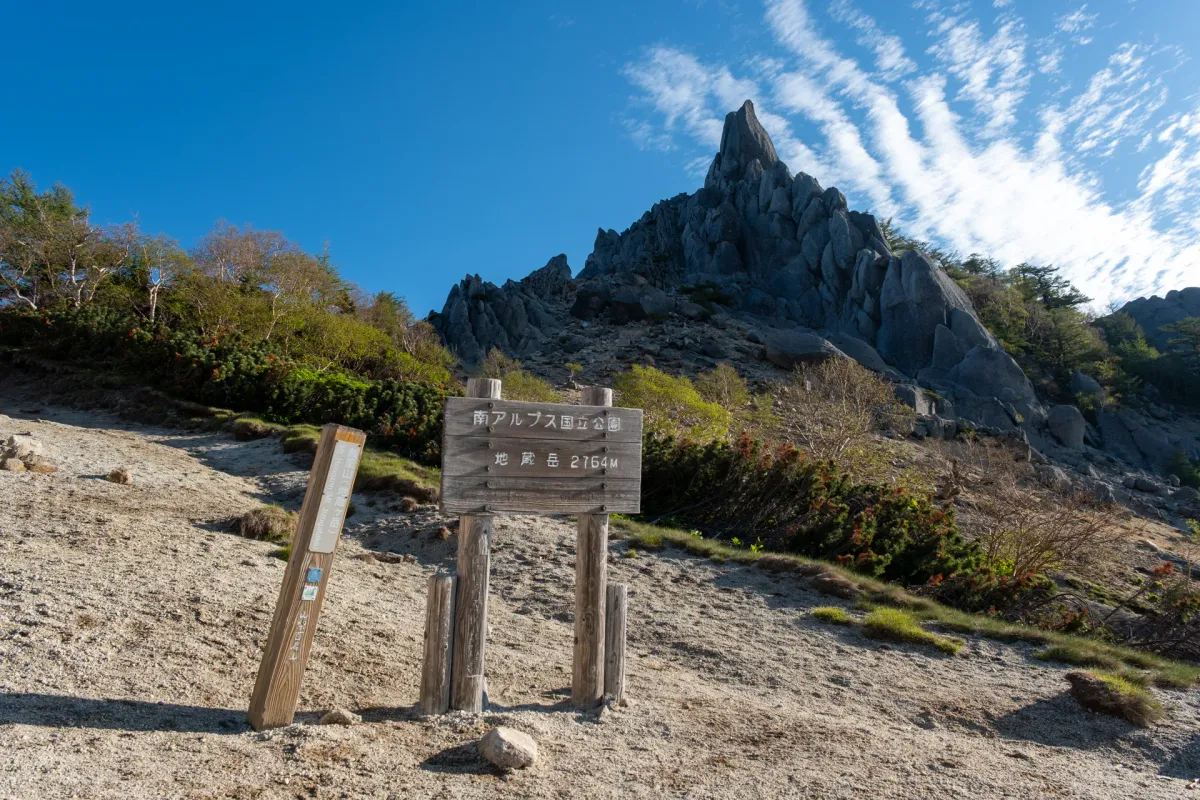
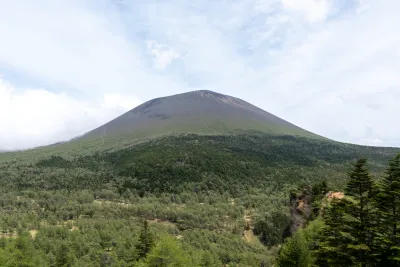
And eventually a pointed peak comes into view, known as the “Obelisk”. This is considered to be the most iconic part of the Mt Houou hike.


Even with the Obelisk seemingly right there, the climb up the steep sandy terrain felt like it took a really long time.

At 6am I made to Mt Jizo-dake (地蔵岳, elevation 2764m).

As well as being a Hundred Famous Mountain the wooden pole on the left also marks this as one of the Hundred Famous Mountains of Yamanashi prefecture.
The peak is full of Jizo statues.


It’s said that couples who would pray for a child could borrow one of these statues and take it down with them - and once they gave birth, bring two statues back up in return.

Directly behind the field of Jizos was my first view of one of the major peaks in the Southern Alps - Mt Kaikoma.


Quite oddly, the official YAMAP course for this hike expects you to make it to the peak of the 18m-tall Obelisk.

It didn’t really look that climbable, though, so I decided to give it a skip. When reading Fukuda’s book on the Hundred Famous Mountains of Japan he notes that Walter Weston climbed this obelisk in 1904, in possibly what was the first instance of someone rock-climbing in japan.


Out across in the other direction, I could see out to the second of Mt Houou’s three peaks, Mt Kannon.

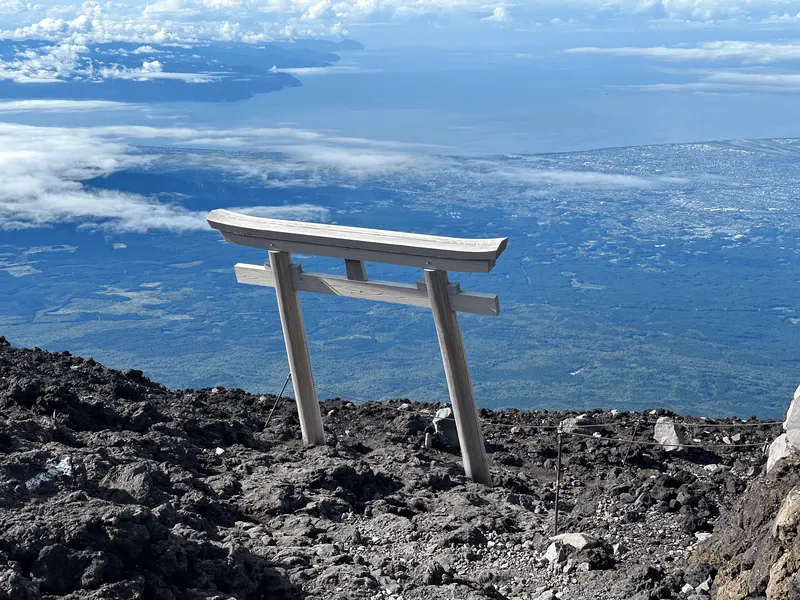
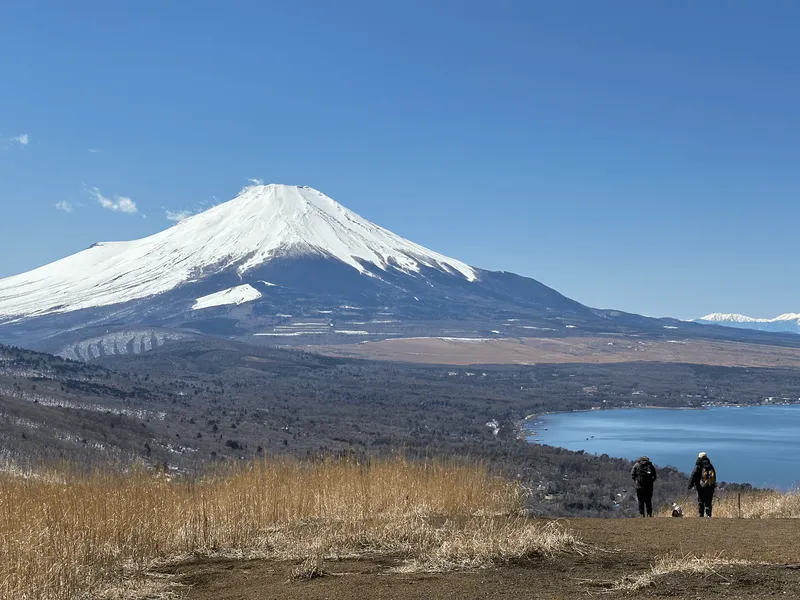
And quite delightfully, a clear view out to Mt Fuji poking his head up above the clouds.

Out to the left of Mt Kaikoma is also another of the Southern Alps’ peaks - Mt Senjo.


From the Obelisk, you’ll do a climb up to another “peak” on the map (although not one of the main 3 peaks) called Mt Akanukezawa-no-atama (赤抜沢ノ頭).

And from here you can get an excellent view out to Mt Kita and Mt Aino, Japan’s second and third-tallest peaks.

Between Mt Akanukezawa-no-atama and Mt Kannon you are faced with a steep descent and then a climb back up.


As I headed towards Mt Kannon and occasionally looked back - I could see the Obelisk start to be enveloped in fog.

I took a look at some other people’s YAMAP logs later that day, and day-hikers who reached the summit a couple of hours after I did didn’t get to enjoy much of a view. So in this case it really paid off to do this one as an overnight hike!


Reaching Mt Kannon
Eventually the peak of Mt Kannon starts to come into view.

And a little before 8am, I reached Mt Kannon (観音岳, elevation 2841m).

The same with Mt Jizo, Mt Kannon also had a regular peak marker plus another pole marking it as one of the “Yamanashi 100”. I’m a little over a third through the way of the Yamanashi 100, so I was curious whether I would get 3 Yamanashi peaks for the price of one hike - but alas, Mt Houou only counts for one.
As a side note for peak-baggers, as Mt Kannon is the highest point on the course this is the official point you need to tread to count as having summitted Mt Houou (at least, if you are using YAMAP anyway).
There was also this weird pyramid.

If I had to guess it’s some sort of triangulation spot or “sankakuten”. Otherwise I’m not too sure why you’d want to lug something heavy like that up here! There was one at each of the 3 peaks.

From here it was a traverse across to the third and final peak of Mt Houou.

After a continuous climb on day 1, and another continuous climb on day 2, this was finally the part of the course where I got to enjoy some blessedly flat trail.

It seems like somewhere around here you can get a stunning view of Mt Fuji directly in front, so that was about the only thing I missed out on today scenery-wise. I could see that Mt Kita was no longer visible as well - so it goes to show that having that early start really paid off for me.


It was a short 20-minute walk across to the third peak of Mt Yakushi (薬師岳, elevation 2780m). It seems this guy only gets the one peak marker.

Although this Mt Yakushi is in the Southern Alps, there is also a separate, more famous Mt Yakushi in the North Alps (elevation 2926m) so be sure not to get the two of them confused.

A short distance from the peak is also the Yakushi mountain hut (薬師ヶ岳小屋). If you were coming up from a different trailhead (Yashajin Pass), this would be a good spot to spend the night.
Finally, the descent back to the trailhead
With all that climbing, I knew that there was going to be a long descent ahead of me.

As I entered into the forest, picking my way over steep boulders and tree roots, I resigned myself to 4 hours straight of this.


However! Not all hope was lost, for I suddenly found myself in yet another biome. The path got a little less steep from here too, so it was more enjoyable.

Some of the debris had been overgrown with moss, and I amused myself with attempting to pick out creatures.


As the trail continued to drop in elevation, I could see the environment change.


Usually with YAMAP there are occasional waypoints on the map. On this descent, there was absolutely nothing for nearly 3 hours so I was kind of looking forward to the next one.

The final part of the descent was some switchbacks down through the forest.

And with the descent over, the final 40 minutes of the hike is along a gravel road, so it was nice to be able to zone out a bit.


It’s around here that I got cell reception back on my phone, so that made it an easier way to pass the time.


The road back runs alongside a stream, which is rather nice to listen to as well.
Towards the end of the trail, there is a shortcut where you can cut across the river (if it is low enough), rather than taking the long way around.

The river crossing is at the bottom of a slope, and it really sounded quite loud so I decided to skip seeing if I could cross it, and just stick on the road.

The final stretch of road was very familiar as I had driven up it just 28 or so hours before.

And I ended up finishing the hike around 12pm. It felt so good to see my car again!

Hiking course options
So many options to climb this mountain! There are four trailheads to Mt Houou, and all have public transport access. However it seems public transport is most convenient via the Yashajin or Hirogawara trailheads due to the greater frequency of busses.
The hike I took starts at the Aoki Kosen (青木鉱泉) trailhead, takes you along the Dondoko-sawa past some beautiful waterfalls. There are some portions of the climb where you must cross a small stream (I did it without getting my shoes wet, so nothing major) plus hoisting yourself up on a rock via a rope. Then you will climb up to the mountain hut, onto Mt Jizo, and traverse across to Mt Kannon and Mt Yakushi before you descent via an alternate path to the trailhead. This is the only loop course available for car users. It is possible to do for public transport users, but requires more prior preparation as you will need to make a bus reservation.
If you are staying overnight at the hut, the loop course will normally have you tackling all 3 peaks on day 2. However it is possible to do a bit of a variation on this:
- e.g. this YAMAP user passed the hut and dropped off their gear, then did a loop around Mt Jizo and then back to the hut on day 1. If you zoom in on their map, you can see there’s a shortcut path that lets you climb Mt Jizo and then loop back to the tent-site. On day 2 they did Mt Kannon and Mt Yakushi.
- e.g. this YAMAP user did something similar, but just headed up Mt Jizo on day 1, and then took the same path straight back down.
Doing this could be useful if you arrive at the hut on day 1 with lots of spare energy (and time) and/or if the weather is looking worse on day 2. Mt Jizo offers some great views of surrounding mountains in the Southern Alps, so if it looks like there’s only clear skies on day 1, it might be worth making that hike up.
I will also note that when climbing this on a weekday, I found the course to be very quiet on the way up. I saw 2 people (both descending) on my climb, and I was mostly alone on day 2 (save for 5 - 6 people that I passed on the final descent who were heading up in the opposite direction). One of the reasons for this is that it is a weekday, but also the buses for the season hadn’t started up yet. The other reason is that the loop course is most popularly done as a long day hike. So any other people who may have started on the same day as I did would have had a much earlier start, and on day 2 vice versa - anyone else doing the same course would have been way behind me.
The carpark was quite empty though, so I suppose maybe June is a bit early for hiking Mt Houou. There was also a possible bear sighting in mid-May, so keeping all of this in mind I decided to put on my bear bell for most of the hike.
This out-and-back hike starts at the Gozaishi Kosen (御座石鉱) trailhead, takes you via Tsubakuro-atama (燕頭山) then up to the Mt Houou hut. Finally from there, you can climb up to Mt Jizo (地蔵岳), one of the 3 peaks of Mt Houou. The Mt Houou hut’s website notes that this trail is well-maintained, and although the first climb up to Tsubakuro-atama is steep, it is otherwise suitable for beginners.
This is the shortest course to climb to Mt Jizo and the Obelisk. However note that you will skip the other two peaks of Mt Houou (Mt Kannon and Mt Yakushi). Mt Kannon is the highest peak and what counts towards having “climbed” Mt Houou (for the purposes of a hiking app like YAMAP which tracks your hyakumeizans) so it depends whether that is important for you.
This is another out-and-back from the Yashajin Pass (夜叉神峠, yashajin-touge) trailhead. Similar to the Gozaishi Kosen route, you will not hit all 3 of Mt Houou’s peaks on this course. However you will hit Mt Yakushi and Mt Kannon - which at least will count you towards having “climbed” Mt Houou. Of course you could also extend your hike to keep going onto Mt Jizo, but then you will have to backtrack so that makes for a very, very long hike.
This seems to be the one of the better courses for public transport users, as there a few more busses running from Kofu station and it doesn’t require a prior reservation.
As this is a traverse, it is only suitable for public transport users, but the upside is you will hit all 3 of Mt Houou’s peaks. Basically you combine the Yashajin Pass and Gozaishi Kosen courses together - the other benefit of this is you don’t have to do a boring double-back. But you will need to book the bus from Gozaishi Kosen in advance.
Starting at the Hirogawara (広河原, hirogawara) trailhead and finishing at Yashajin Pass, notably this is (by a small margin) the shortest course that has you hit all 3 peaks, and the busses don’t require bookings so it’s probably the most convenient traverse. RidgelineImages has done a variation of this course in reverse if you are interested.
Public transport access
There are lots of busses running to the Yashajin Pass (夜叉神峠, yashajin-touge) and Hirogawara (広河原, hirogawara) trailheads. (See timetable here). So this seems like the most accessible option for public transport users.
You’ll first need to get an Azusa express train (bookings required) out to Kofu station (甲府駅). From Tokyo, it will take 2 hours. The most reasonably timed bus you will be able to catch is the one at 09:05, from which it’s a further 80 minutes to get to the Yashajin Pass trailhead at 10:17am, or Hirogawara at 10:58am.
In 2026, the bus is running every day between the 26th of June to the 3rd of November. For the timetable I linked above, the times marked with black circles are only running every day between 18th of July - 23rd August and on weekends on 24 August - 3rd November.
Similarly in the timetable linked above, you can see there are a number of busses on every day. If you’re returning from Yashajin Pass, you will probably be aiming for the 12:41 or 14:41 bus if you did it as an overnight hike.
The Aoki Kosen (青木鉱泉) trailhead is where I started from, and along with the Gozaishi Kosen, are both options if you are planning on staying at the Houou hut. They do have busses available.
The Mt Houou hut helpfully provides up-to-date info on the busses. In short:
- You would first need to get the Azusa express train to Nirasaki (韮崎) station. Leaving Shinjuku at 7am, you would get to Nirasaki at 8:26am (or a little over 2 hours from Tokyo station) The Azusa requires prior bookings, otherwise you can wake up a lot earlier and get on a slower (but cheaper) local train to get to Nirasaki
- From the #2 bus stop, there is a bus departing Nirasaki at 09:10am, arriving at Aoki Kosen at 10am or Gozaishi Kosen at 10:15am
The busses only run on weekends and public holidays, starting from June 20 through to October 12 in 2026. They need to booked, and bookings open up 1 month in advance. The website for the bus is here.
Note with a start time of 10am from Aoki Kosen, you will need to maintain a good pace up the mountain to make it to the mountain hut by its 4pm cutoff. If you are a bit worried about your pace, you can start at Gozaishi Kosen instead, or spend a night in Nirasaki the night before and get the earlier 07:10 bus.
There are two return buses from Aoki Kosen and Gozaishi Kosen, running at 13:30/13:45 and 15:30/15:45 respectively. With an early start from the hut you should be fine to make it down in time for either of those buses. I assume though you will need to plan in advance and book one of those timeslots.
Car access details
Out of the 4 trailheads, the Hirogawara (広河原) trailhead is the only one that doesn’t have a carpark. The other 3 are all located a little under a 3 hour drive from Tokyo. If you are doing this as an overnight hike, you can feasibly set out early in the morning, and aim to make it to the trailhead by about 9am to give yourself enough time to finish your hike on day 1.
Aoki Kosen
If you are taking the Dondoko-sawa course, you will park at the Aoki Kosen (青木鉱泉) which is an onsen/lodge. The onsen here maintains the carpark.
Note that the drive up here is about an 8km road in total, but the first 1.5km is along a really narrow, gravelly path that had me doubting whether I was on the correct route at all, or if Google was taking me somewhere weird. Eventually once you pass the gravel bit there is a long stretch of smooth concrete you get to run along. The final stretch up to the onsen building is again on gravel.
The carpark is split into a couple of separate gravel fields.

The onsen carpark costs 800 yen per day (1600 yen for 2 days), and there is a public toilet available. I’m not sure when the onsen people are on-site, but definitely they are probably not around in the early morning. So you have to pay your parking fee into a mailbox.
From the front of the onsen building, head around the right side of the building.

Hug the wall of the main onsen building, and you’ll come to this little table setup.

The white drawers are lockers for your valuables if you are using the onsen, so ignore that (at first I got confused and thought I was supposed to put the payment in there).

Instead, take a brown paper envelope and a white form. Write down your car’s license plate details on the white form, put it in the brown paper envelope with your cash, and then put the envelope into the black locked mailbox on the wall there.
If you don’t have exact change, you can pay extra. Apparently the onsen staff will leave a receipt tucked on your car’s window wiper, and you can take the receipt back to the onsen after your descent and get exact change. I’m not sure if this is an every-day thing or a weekend-only thing, so it probably is best to just remember to bring along the exact change.
Gozaishi Kosen
If you are taking the Tsubakuro-atama course, you can park at the Gozaishi Kosen (御座石鉱泉) carpark. This one is free. The parking lot is open, but the Gozaishi Kosen building itself has been closed since 2023. It seems to have toilet (according to a Google Maps review).
Note that if you wanted to do a hybrid of the Dondoko-sawa and Tsubakuro-atama courses (to save money), I did see one example on YAMAP of someone climbing via Tsubakuro-atama, then descending via Dondoko-sawa. This took them via Aoki Kosen, and then they had to walk an extra hour to get to Gozaishi Kosen where they parked their car. However they noted the trail was poorly maintained between Aoki and Gozaishi, so I wouldn’t recommend it.
Yashajin Pass
If you are hiking from Yashajin Pass, there is a large carpark here. Some of the Google reviews seem to note that the Google Maps app will give up on GPS-navigation partway through - but it’s up a long mountain road so if it cuts out you can probably just keep on going and you will get to the carpark eventually.
When to hike Mt Houou
Mt Houou seems to have its snow melt little bit quicker than other mountains in the Alps, so it’s a good candidate to kick off your summer hiking season. Momonayama notes that you can climb this without snow from the end of May to the end of October.
Staying at Mt Houou’s mountain huts
Mt Houou hut
The Mt Houou hut (鳳凰小屋, hou-ou-goya) is accessible from both the Dondoko-sawa course (ドンドコ沢コース) and Tsubakuro-atama course (燕頭山コース) or the Aoki Kosen and Gozaishi Kosen onsens. From the hut, it’s an extra hour to reach Mt Jizo (the first of Houou’s 3 peaks).
The hut runs their website here. If you want to stay at the hut, they only accept reservations over the phone. Staying in a tent will require a reservation on Saturdays, as well as during the Silver Week holiday period in mid-September. Otherwise, no reservation is required, but they just ask you to arrive before 4pm. If you scroll down on their info page, you can see the exact dates that tent reservations are required in red.
Staying at the tent site costs 2000 yen per person. There’s unlimited free drinking water, plus the toilets were fairly clean as well.
Mt Yakushi and Minami-omuro huts
If you are coming from the Yashajin Pass (夜叉神峠, yashajin-touge) trailhead, you have two more options - Minami-Omuro hut (南御室小屋, minami-omuro-goya) and Mt Yakushi hut (薬師ヶ岳小屋, yakushi-ga-dake-koya). Both huts share a website here.

Read more
Recent posts

Leave a comment